Search This Blog

Friday, April 10, 2015

Fireplace Remodel Maple Beam Mantel and Hand Carved Corbels


New Fireplace surround and Maple Mantel w/ Corbels
Walnut Creek, California 2015
Tile work by Palermo Tile


Fireplace before
 Original brick surround and hearth
No overmantel
Old Mantel removed
Hiding the Flat Screen TV wires
Framing the overmantel
New overmantel getting tiled
2x4 for temp support of tiles
Hole for Flat screen junction box
New overmantel extends to ceiling
Gabled beam ceiling

New sand stone 24"x12"x1.25" hearth by Palermo Tile
New corbels cut from New Maple mantel beam 
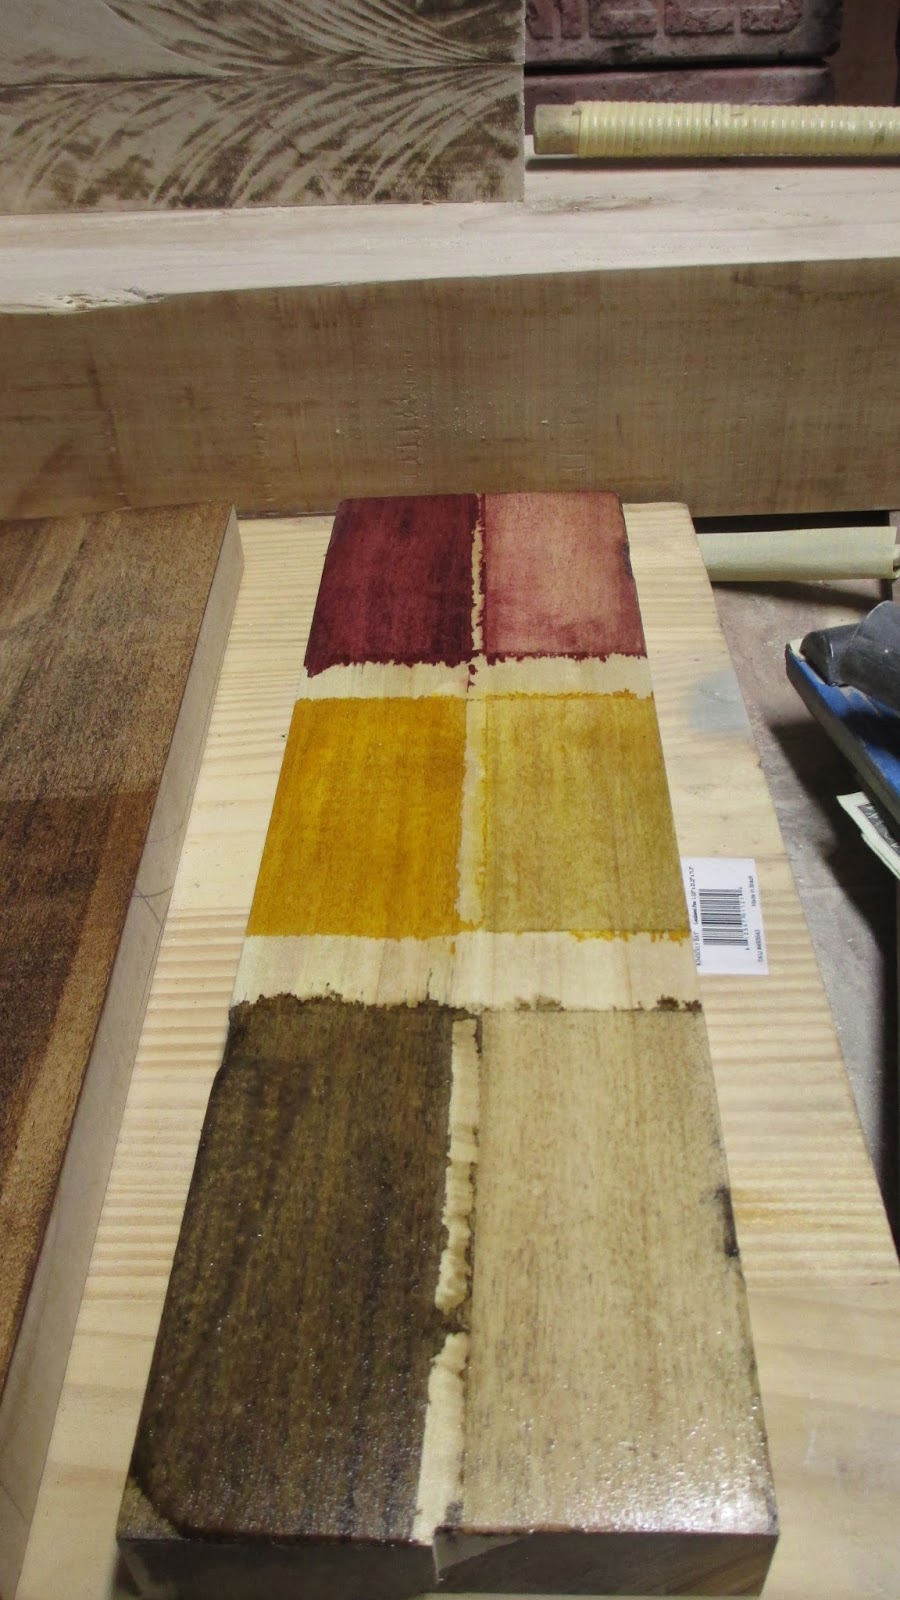
Maple staining samples:
400 grit
1 coat of Clear Shellac

Maple staining samples:
400 grit
1 coat of Clear Shellac

General Wood Dyes on Hard Maple
Left side stain on bare wood 400 grit
Right side seal coat of shellac applied before dyes
All samples sealed with a top coat of shellac

Hard Maple stain samples:
bottom half of sample got boiled linseed oil before a medium brown dye was applied.
Top half was sealed with shellac then dyed with General finishes medium brown
Both samples top coated with clear Shellac


New hand carved Hard Maple corbels and more staining samples
Maple Corbels and quarter round trim fabricating
New fireplace and mantel finished

Maple mantel dark stained with General Finishes Medium Brown Dye Stain
and Varathane oil based polyurathane satin finish

I lightly distressed the wood before staining for a more natural look 
Close up of maple beam mantel

Here you can see the finish is still drying

The distressing process involved a pocket knife and a little sanding

4.5"x7.5" solid maple beam stretching 82" long and the Corbels are 14"x4.5"

(5) ½"x12" anchor bolts drilled into support blocking behind the tile support the beam while access to the nuts and washers are hidden by corbels. Very secure mantel.

Maple is a difficult wood to stain even with experience. I have learned through the years that consistent sanding 80 up to 400 grit helps control the common blotching issues seen in maple 

Tile by Palermo Tile. Maple beam mantel in Walnut Creek, California 2015

Maple Beam mantel by Cahl Roach with Palermo Tile in Walnut Creek, California 2015


Tuesday, May 20, 2014

Door hanging and Stain grade Trim work * last summer 2013 *


Redwood city remodel: Hired to take over installing of doors, door frames and trim. Walls were farther than usual from plumb or square (notice the descending distance between the ceiling above these sliding closet doors) The floor and ceiling are parallel. Making everything work required installing a longer door frame leg and longer trim casings on the RHS to cutting the bottom of the door and adding tapered framing below the header on LHS. this was implemented to avoid a staggered trim casing hight between these two doors. Did I mention these doors are on sliding rollers??

Doug fir veneer (solid wood) frame and panel doors


Closing the gap on this doors mitered corner joint required adding biscuits and ripping the back side of the trim casing at a taper from top to bottom... independent of the door frame on the other edge.

Tile work by Palermo Tile

Monday, August 19, 2013

1993 FORD MUSTANG GT shinannegins


New 5 lug disk setup 14" rotors cobra calipers, tubular front k-member and a-arms, upgraded brake booster diy driveway paint job and the madness continues...

home made LED 3rd brake light

fixed the notorious broken cluster tabs

making new door cards

installing viper 5901 remote start 3way pager alarm
the 16" Ponies getting new paint


tracing a transmission leak
new smoked lights were a gift. I didnt like them at first to gangster for my taste  but I got used to them.
alternator gave up the ghost on the old bay bridge
making some space for new amp to hide under back seat

cut support bar and flipped it over removed some foam
 and boxed the inside corner of frame to make it fit
fan clutch needed to be replaced it was stuck (un-clutched) and warm up was taken forever so...
hmm… dont think the torque boxes are supposed to flap in the wind??

welding home made battle boxes in and repairing some of the side effects of pre-owner-ignorance
who loves to replace a heater core more than me?

since its out why not refresh everything..
idk how this went unnoticed on purchase day??
radiator support was much worse before this picture.
New maximum motorsports strut tower and k-member braces added


since its on the bench anyway might as well repaint it
and fix the bondo filled hole from where the ford emblem was removed  by p.o

2002 cbr f4i in the backround. easily accomplished roll-on wheelies in 1st gear.
 impresive for 600cc


ridin' on gold ones!
for a week then went back to the anthricite silver or whatever its called
metal fatigue. great. here we go...


at the middle of back seats where driveshaft meets pig... 


more in the center of the bulkhead and tranny tunnel intersection...

and yes it goes all the way through! notice the factory seat belt reinforcements
to make your seat belt less likely to rip-out of the floor in an accident
not easy to remove the galvanizing coat and weld the tear closed w/o burning through
all the spot welds holding the S frame and trunk floor together were pulled apart also...

added 4 bolts to help pull things back into place before welding...

DIY torque box reinforcements from template I found online...

welding practice. this car is my welding college.. 

S-frame and pinion snubber could never agree on anything
so they went their separate ways...

welded up and primed...


welded primed and top coated black (semigloss)

with all the carpets out what better chance do you get to… rewire the interior!!


sorta regret not doing thru-floor subframe connectors when the opportunity arose
but at this point I was over it...